Showing posts with label halloween. Show all posts

Wednesday, October 21, 2015

Tips for Making your own Halloween T Shirts

Halloween Shirt  by @jbckadams #halloween #vinyl #heattransfervinyl #glowinthedark #expressionsvinyl
Recently I took a (small ;) step away from my paper, scissors, and glue and played with heat transfer vinyl. Today I'm sharing tips for making your own Halloween t shirts.

I used my Silhouette Cameo and glow in the dark heat transfer vinyl and gold glitter heat transfer vinyl to create these cute Halloween t shirts for my kiddos. I get all my vinyl from Expressions Vinyl. They have the best quality and THE best customer service. Love them!!!

I started by cutting the shapes from the Silhouette store. Tip #1 remember to reverse your images by using the mirror function before you cut. 

Halloween Shirt  by @jbckadams #halloween #vinyl #heattransfervinyl #glowinthedark #expressionsvinyl

After I cut the vinyl and removed the negative pieces, I was left with vinyl that was ready to be ironed onto my kids black t shirt.
 The words will be backwards (that's a good thing, right now).
Are you ready for tip #2? It's a good one... Tip #2 Use a piece of parchment paper on top of your vinyl. This will prevent any residue from sticking (and making a huge mess of) your iron .
I put my iron on medium heat (Tip #3 make sure to press down firmly with your iron onto the vinyl) while I was adhering the vinyl. At the end of this project I had 2 HAPPY kids. I didn't get a picture of the shirts glowing in the dark. My kids were way too busy for that nonsense. They are awesome in the dark, especially the t-rex.
I have a little girlie who is pretty good about her momma constantly taking her picture.

Halloween Shirt  by @jbckadams #halloween #vinyl #heattransfervinyl #glowinthedark #expressionsvinyl
Then....there's my little man. He's not as happy and cooperative when I need a photo. Just after I got him in his brand new fancy t-rex shirt he ran out and played in the sandbox (hence the not so clean shirt in the photo).
Halloween Shirt  by @jbckadams #halloween #vinyl #heattransfervinyl #glowinthedark #expressionsvinyl
 He may not be the most cooperative model but I still like him...lots!
Halloween Shirt  by @jbckadams #halloween #vinyl #heattransfervinyl #glowinthedark #expressionsvinyl

Halloween Shirt  by @jbckadams #halloween #vinyl #heattransfervinyl #glowinthedark #expressionsvinyl

Halloween Shirt  by @jbckadams #halloween #vinyl #heattransfervinyl #glowinthedark #expressionsvinyl
 Hurry, you've got just enough time to get your supplies and get some t-shirts made...your kiddos will love you and do their chores without complaining. Okay, that may be pushing it but I did get a clean kitchen out of this deal.
Thanks for stopping by today!
(This post contains affiliate links, by purchasing items through these links you will not pay more for any of the items I will just receive a small percentage of the sale. These affiliate links help to keep my blog running, thanks for your support.)


Tuesday, October 13, 2015

DIY Halloween Decor

Oh I love Halloween and I love making my own Halloween decorations, hence the DIY Halloween Decor blog post. I created some fun projects with the Minc machine by Heidi Swapp. I also used this adorable gallery prints set.
DIY Halloween decor by @jbckadams using the Heidi Swapp Minc machine and gallery prints by @pebblesinc #halloween #DIYHalloween #Pebblesinc #HSMinc #HalloweenDecor

Monday, November 3, 2014

Page Maps November Reveal

I can't believe it's November already! We had a great Halloween. Lots of candy and family and fun! We started off the day by taking the kids to some businesses in our little town where we had family members working. That was the bulk of our trick-or-treating, kinda lame but the kids loved it! Then we had lunch with Grandma, Grandpa, and a few cousins. In the afternoon we carved pumpkins and made dinner. The kids did a little more trick or treating in our neighborhood. We ended the evening with a big bang and watched Hocus-Pocus. Okay so maybe that wasn't really a bang but the kids loved it and the adults got a good laugh out of the whole 90's movie thing.

Today the Page Maps newsletter hit your inbox. I'm so thrilled to be part of another Page Maps newsletter. I was also part of the September Page Maps newsletter. For November's Page Maps newsletter I did a double page layout. *gasp* I know! It's also the second double page layout I've done recently. You can find the details about that adventure HERE.

For my project this month I used the Pebbles Home+Made collection. These are photos that I took the a couple of weekends ago when my brother and his family were here.
 Oh wait, I forgot to show you the sketch I was given.
Once again, not what I would typically create with, LOTs of photos and double page spread, but I loved thinking outside of my normal creative box and trying something new. Here's my final project:
Make sure you check out what the other Pebbles designers have created for Page Maps this month. Have a great weekend!

Tuesday, October 14, 2014

Halloween Layout


I'm been doing a few projects with the Pebbles Thirty-One collection lately. I shared some cards with you last week. Today, I have a layout on the Pebbles blog and I created a similar one to share with you. This layout is one that includes six photos of my kids and my nieces and nephew last year at Halloween. Typically I don't use six photos on one layout. My comfort zone lies within the one-three photo range. When I do need to use more than one photo on a layout I most often put them on a grid. That's the easiest way for me to add more than one photo. By putting the photos on a grid it almost makes it seem that I'm working with one big photo.
I mixed in a few bits and pieces from the Home+Made collection in with supplies from the Thrity-One collection too. The scalloped gold glitter tape is amazing! I've already used an entire roll of it. (I need to order more.)
 I added a few stickers to the right of the photo grid to create a little Halloween vignette.
Now, you need to hop on over to the Pebbles blog and see the layout I created for their blog.
Thanks for stopping by for Let's Talk Tuesday.

Friday, October 10, 2014

Halloween Cards

 
Hello! Happy Friday (evening).
This week has completely gotten away from me. Yesterday I inteded to have a post about my kiddos and their Halloween costumes. Which would require me to get them in their costumes, get their hair and makeup done, and take photos. Well...it didn't happen, obviously. I will get a post up about their Halloween costumes but it won't be in time for Halloween week. I apologize.
I do have one more project Halloween project to share with you today. I created these cards using the Pebbles Thirty-One collection:
(Just a little side note about this photo...my little man took it. He's 5. I'm very proud of his photography skills. I'm thinking about hiring him as my official photographer, although, I'm not sure I can afford him, ha ha ha.)

Both of these cards are SO simple. I simply used stickers from the sticker sheet to create a Halloween vignette.
Isn't that little Dracula adorable?
I couldn't finish this card without adding a little bit of glitter tape. Glitter tape is wonderful! I love that I can use it without getting glitter EVERYWHERE. My hubby also appreciates the fact that our entire house isn't covered in glitter! 
Do you create cards for Halloween? I don't create many but I do like to have a few on hand, I use some of them for October birthdays.

Wednesday, October 8, 2014

Halloween Decorating Ideas

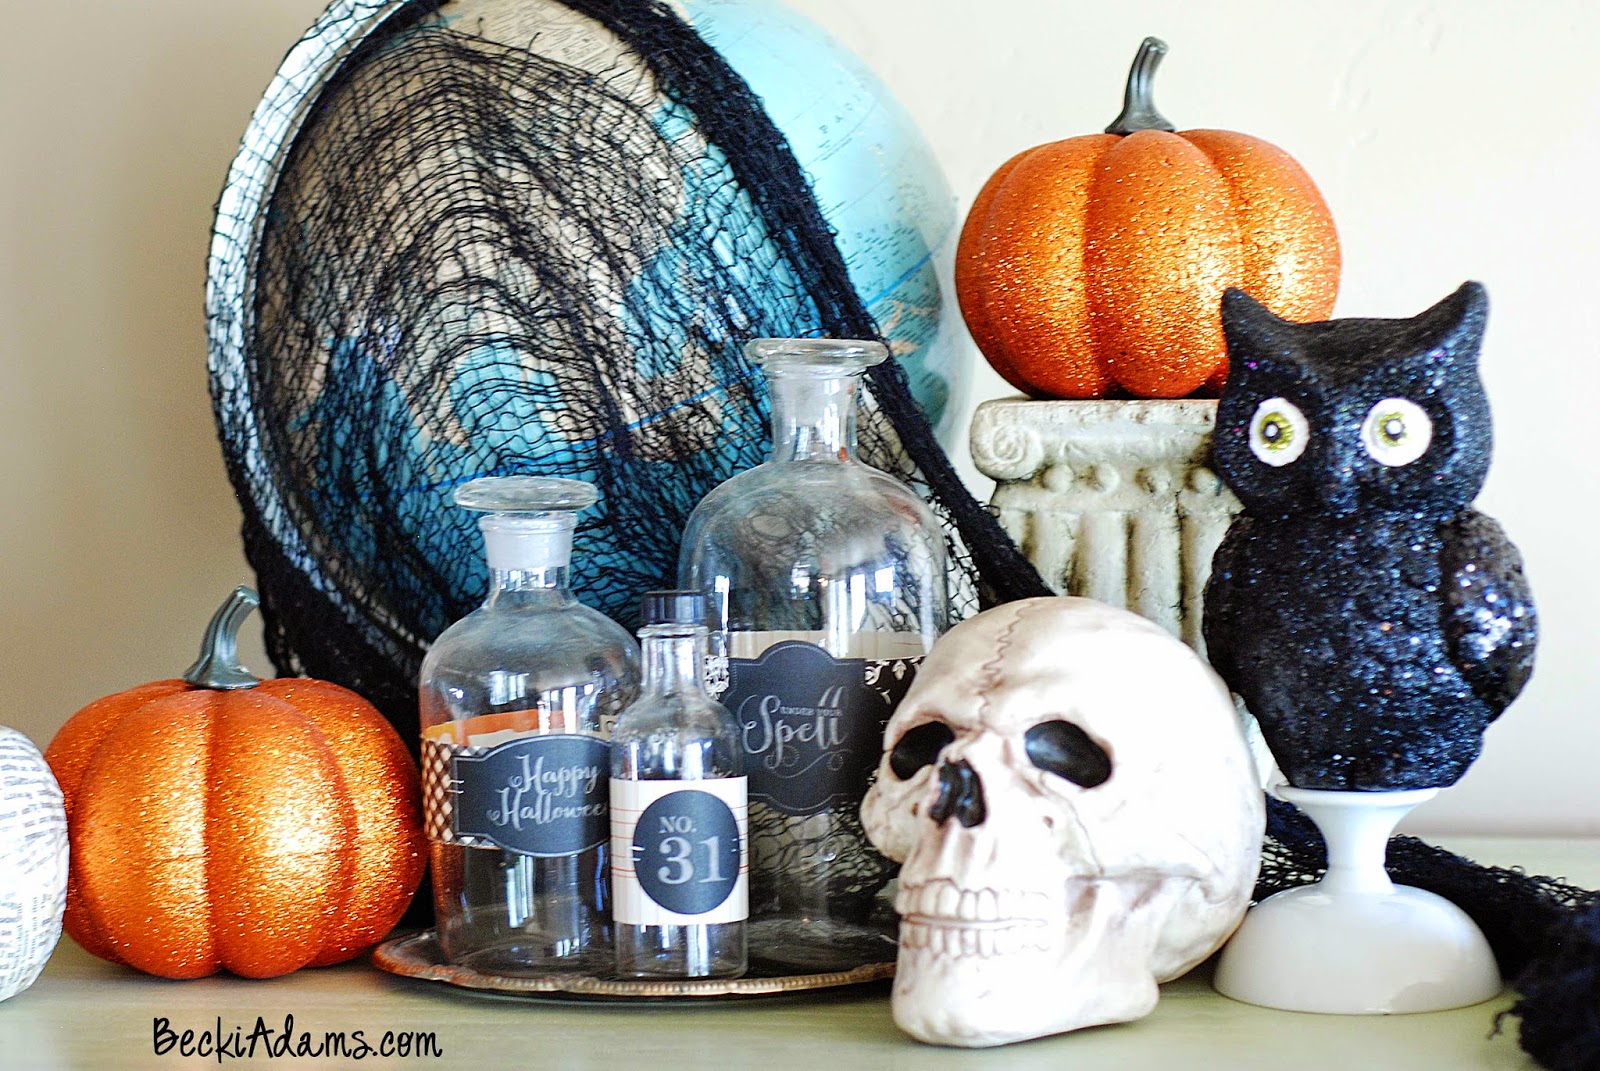
As I mentioned earlier this week I started decorating for Halloween in the middle of September. Each year I add a few things to my decorations and donate a few things to the thrift store. This year I added a few skeletons, a huge spider, and my spider web wreath. Here's what Halloween at our house looks like:
Halloween Decorating Ideas by Becki Adams
 This is the vignette that sits on top of our entertainment center. I usually take down some the 'everyday' decorations but I also leave some of them up. The globe is always on the entertainment center. I love it! I just draped some black Halloween cloth over the top. The bottles are also usually up there every day. I did add some Halloween labels to them though. The labels are just stickers and patterned paper.
Halloween Decorating Ideas by Becki Adams
I added the huge spider to our decorations this year. My little man was not a fan when I took this spider out of the box. He was terrified by it! We actually went through several possible homes for this spider before he came to live on my vintage gold mirror. Everywhere we moved the spider Austin said "he's still looking at me."  When we put him on the mirror he was finally satisfied because the spider is looking at the entertainment system not at him. Needless to say he hates spiders. He's having a hard time with the whole Halloween season because there are spiders everywhere. Hopefully, he'll adjust and we'll be able to walk past the Halloween at Target again soon.
Halloween Decorating Ideas by Becki Adams
Because we don't have a mantle. I decorate the top of our piano like a mantle. Like the other places some of these decorations are permanent (the windmill and the lamp) and then there are a few Halloween accessories. I made the banner using a kit from American Crafts last year. My favorite thing in our Halloween decorations is the skeletons. All of the skeletons are new. I bought them at Target (online). In addition to the ones that are sitting on the piano we have one hanging on each of the kids bedroom doors. The kids love the skeletons too, they've lovingly named them; Edward, Bob & Fred. (Bob is the one sitting on the piano.)
Are your Halloween decorations up? What is your favorite part of your decorations?

Tuesday, October 7, 2014

Halloween Scrapbook Ideas


Today for Lets Talk Tuesday I wanted to share with you some of my favorite Halloween projects to give you some ideas of supplies that you may want to purchase and photos you may want to take. Some of these projects are older and some of them are hot off the press (hot off the press is my version of less than a few weeks old).
This Halloween project is a little bit unusual. I used a Valentines day themed kit for this layout. I think it worked though...that photo of my niece is one of my all time favorites.


All three of these layout I did with Bella Blvd Halloween (Too Cute to Spook). This is one of the easiest and most fun collections I've ever worked with. I only have a few small scraps left of this collection.


These two layouts are created with Bella Blvd Halloween newest collection (Halloween Magic). This collection is just as easy and fun to work with as their previous Halloween collections. Have I ever mentioned that I LOVE Bella Blvd?!?!?
This last project I created for Elle's Studio. I used a mixture of their everyday supplies and a few things from their current Halloween kit. Aren't those wood veneer pieces adorable? I've got another one of these kits sitting on my desk waiting for this years Halloween photos. (You can find that kit HERE).

I think the biggest tip I can give you as far as Halloween photos go is to do a Halloween photo shoot before the big day. I take my kids out (and usually a few extra kiddos) a few days before Halloween and get some good photos. It took me a couple of years of being frustrated about photos that were too dark and blurry for me to realize that taking photos on Halloween night doesn't work for me. I love having photos done before all the fun and chaos of Halloween night.

How do you prefer to do your Halloween photos? Do you take them early or do you just wait until the big night?
BLOGGER TEMPLATE BY DESIGNER BLOGS