Showing posts with label family. Show all posts

Tuesday, October 28, 2014

Inspired by Pinterest

 
Pinterest has taken the crafty world by storm and that's no different for the scrapbooking world. I could spend hours and hours pinning beautiful layouts, mini albums, and cards...oh wait, I do! As of today I have 2,021 on my scrapbooking Pinterest board. That number grows almost daily. Pinterest is a great tool for finding and organizing great ideas! It's also a great tool so that you can find out what your preferences/style are. For example if you look back at your Pinterest scrapbooking board and see that 90% of the layouts that you've pinned have a white background, you may want to start your next project with a white background. The same thing can be said for many different things: the number of photos on a page, a color scheme that you see repeatedly, or the placement of embellishments.
Recently, I was scrolling through my Pinterest board looking at what projects had been repinned the most. I was shocked to find that one of the layouts that I had pinned has been repinned 1,484 times (as of when I'm writing this post). None of my other scrapbooking pins can even come close to that number.

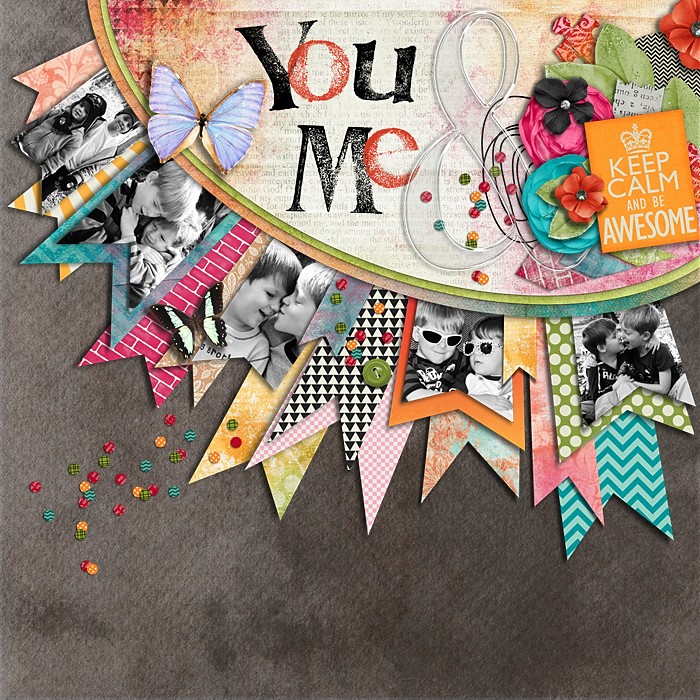
LPBA_lg
This layout was created by Libby Pritchett. I think that she's a digital scrapbooking designer. I decided that I would recreate this layout using my own supplies and my own style. There are a few things about this layout that made me think that I would not like the end result of my project. The first thing I noticed was that the photos were cut unto shapes. I rarely, if ever, cut my photos into shapes. If I do cut my photos into shapes its a square or a circle, that's it. When I was creating this layout I even thought about trying to rework the design a little bit so I could avoid cutting my photos but the further I got into the project I decided that I would stick with the original design. I cut my photos into a pendant shape *gasp* and I LOVED how it turned out *even bigger gasp*
 I used the Bella Blvd Family Forever Collection. I adore this collection. I find myself reaching for it all the time.

 And here's the final project:
I did a couple of things differently on my project. I added a border sticker toward the bottom of the page. It felt a little more 'balanced' to me with the sticker at the bottom. I also didn't use as many photos on my project. I wanted it to be about my kiddos and I have three kiddos so naturally I have three photos on my layout.
I gave this basic idea a second try using the same concept but switching things up a bit. I came up with this last night:
 This layout is a combination mainly of 2 collections (Gramercy Road by Gossamer Blue and Crate Paper's Open Book collection).


 Have you ever scraplifted a layout you found on Pinterest? This is the first time I've done it and I love the results, you should give it a try!

Thursday, October 23, 2014

Family Photos Mini Album

Recently, Elle's Studio sent me these adorable wood veneer mini album covers.
Autumn Wood Veneer Mini Album Covers
I combined these wood veneer covers with the October Kit, and a few bits and pieces from the Sycamore Lane collection to create a mini album showcasing our recent family photos.
Family Photos Mini Album by Becki Adams @jbckadams #scrapbooking #minialbums #familyphotos
 I loved the detail on the wood veneer cover that I didn't want to do much embellishing on it. I wanted the wood to stand out.
Family Photos Mini Album by Becki Adams @jbckadams #scrapbooking #minialbums #familyphotos
There isn't a ton of journaling in this album it's mostly a fun decoration to sit on the entry way table in our living room.
Family Photos Mini Album by Becki Adams @jbckadams #scrapbooking #minialbums #familyphotos
I love photos of the girls together and the boys together.
Family Photos Mini Album by Becki Adams @jbckadams #scrapbooking #minialbums #familyphotos On this page I added a transparency with a a little bit of flair. 
Family Photos Mini Album by Becki Adams @jbckadams #scrapbooking #minialbums #familyphotos
This two page spread just simply shows the kids ages at the time the photos were taken.
Family Photos Mini Album by Becki Adams @jbckadams #scrapbooking #minialbums #familyphotos
And last but not least...a page for mom & dad :)
Family Photos Mini Album by Becki Adams @jbckadams #scrapbooking #minialbums #familyphotos
Just in case you missed it HERE's a link to the post about how to take your own family photos.
Do you have your family photos taken for the year?

Sunday, September 21, 2014

Life at Our Home

When I read other blogs my favorite post are those that give me a glimpse into the bloggers life. I love learning about other people. It's nice to know who is really behind the words and photos. Today, I thought that I'd give you a little insight into life at our house.


I'd like to tell you that things are going super, fantastic, and nothing is ever wrong or out of place. Maybe I wouldn't like to tell you that. It's never fun to hear that everything is "perfect." I've mentioned before that I was diagnosed with Ankylosing Spondylitis just over 2 years ago. Most of the time things go well. I do well on my medication and other than a little soreness and tiredness I don't think much about it. For the last couple of years when Fall has come around things have changed quite a bit. (The cooler weather is the culprit). I get a lot more tired and a lot more achy, which makes me a lot more cranky (and it turns me into a poet too apparently, LOL). Things that usually run pretty well around our house start to run a little less smoothly.

The kids started school and I did well for a few days. Then, I got hit with a flair-up and I've really been struggling, we've all been struggling actually. I've been able to do the very basics...and I mean VERY basics. I take the kids to school and I pick them up. That's about it. I don't cook, I don't clean, and I don't do laundry. I spend my time either on the couch or in bed, some days are better than others. After my diagnosis my husband rearranged his work schedule so that he goes to work earlier and comes home when the kids get out of school. This schedule has saved our little family; especially lately. Lately when he gets home from work, I go to bed. Yes, it's only 3:30 or 4:00 in the afternoon when he gets home but that's when I've needed to get some extra sleep. When my A.S. flairs up I need lots of sleep sometimes 14 hours a day of sleep. For the most part I've been able to keep up with my scrapbooking committments. Most (actually all) of my recent projects have been done either in my bed or while I'm laying on the couch. I'm so grateful for a great husband that picks up the slack when I'm not well. He does amazingly well at keeping our home up and running. Even with his help it's not been a great 3 weeks for our little family.

Other than momma not feeling well the kids are doing really well. They LOVE school and are so excited about their new friends, classes, and teachers. The two older kiddos have started taking music classes at school. We're now a family with a flute, a violin, a guitar, and a piano. They're so excited to be playing their instruments and can't wait to share each new note or technique they learn. The little man started preschool. If you follow me on Instagram you'll see that I've had a hard time letting him go...he's my baby. I only cried on the first day I dropped him off, since then it's been all smiles at preschool drop-off and pick-up.


So, there's the long version of why things may seem a little different here on my blog. I'm trying my best to keep up and as of today I'm feeling better. Not completely better but enough better that things are starting to return to normal. I'm going to bed at 8:00 now instead of 4:00 (that's a pretty big deal). I started a new treatment on Friday that I hope will make things significantly better. It takes a long time before I will see any change in my symptoms but I'm hopeful that I will see a positive change.
 

I am working on a couple of projects behind the scenes that I'm excited to share with you in the coming weeks. There are some fun holiday projects, fabric projects, some DIY home projects, and videos that I know you'll love.
Thanks for hanging in here with me. There are better days ahead...have a great Monday!

Wednesday, July 9, 2014

Restoring Old Photo Albums into Pocket Page Scrapbooks (Part Two)

If you missed part one of this series you can find it HERE.

Initially I thought I would be able to do this project on my own in my free-time. 

Well, because I got the albums in November and they were still sitting in the same spot, untouched in May I decided to call in reinforcements. 

My mom, my sister, my sister-in-law, and my cousin came to my rescue. We planned a day when we could all get together and get this project done (or so we thought we could get it done. It turns out we'd need more than one day).

When we all get together it's a house full of kiddos. Between us we have 10 kids. I knew that this day would take a lot of effort and planning on my part to make sure we could be as productive as possible. I got all the supplies ready and spread out across my kitchen table. 


I got snacks ready for everyone. 
 Snacks for the kids
and snacks for the moms. Although I made a terrible mistake here and there was clearly not enough chocolate for the moms. I won't make that mistake again, I promise!

The first task was to get the photos out of the albums. Some of them came right off, some of them...didn't. This is where the dental floss and band-aids came into play. We used the dental floss to remove the photos from the sticky background by placing the dental floss under the corner of the photo and gently working the photo away from the backing. 


*tip: put band-aids on your fingers before you do start this process. Otherwise you'll cut your fingers from having the dental floss wrapped around your fingers, pulling against all the nasty adhesive and then you'll need band-aids so you don't get blood on the photos. You can thank me later. 

I did some research on how to remove the photos before I started this process and I chose the dental floss method. A couple of other recommendations were to use heat to soften the glue and then remove the photos. One article recommended putting the pages in the microwave. I was scared that I would scorch the photos or just my luck, they'd start on fire. Another article recommended using a hair dryer. Honestly, I just didn't want to risk heating the photos and having them get warped or scorched. The dental floss was a pain but it worked well. I only had one photo that tore and it was only a very small tear on the side of one of the photos.

After we had all the photos out of an album we scanned each one onto a memory card. As I said in my previous post, I used this Photo, Slide, and Negative Scanner. It worked amazingly well! It was so easy, all you have to do is feed the photo through the scanner! Really, that's it. You feed the photo into the front of the scanner and it comes out the back. When the memory card is full you replace it with a new one. Easy peasy! My only complaint is that it wasn't big enough to scan anything bigger than a 4x6 photo. I knew that when I bought it, so I really can't complain. It wasn't a huge deal because I only had a handful of bigger photos and I was able to scan them using my flat bed scanner. 

Pretty soon we had a stack of photos ready to be put into the new pocket page protectors and albums.

Make sure you stop by next week for Part 3 of Restoring Old Photo Albums into Pocket Page Scrapbooks where I'll have the final product ready to show you, as well as my grandparents reaction.

Here's another look at what supplies I used to complete this project.

Here's a list of supplies that I gathered for this project:
We R Memory Keepers Albums  
We R Memory Keepers Photo Sleeves
Photo, Slide, and Negative Scanner

Waxed Dental Floss 
Project Life Journaling Pens
Self Adhesive Photo Corners
band-aids


Wednesday, July 2, 2014

Restoring Old Photo Albums into Pocket Page Scrapbooks (Part One)


The day after Thanksgiving my family and I made the trek to visit my grandparents. They live about an hour away from our home, unfortunately we don't get to see them as often as I would like to. This particular day we ate, visited, watch some old home videos and then later in the afternoon we helped Grandma put her Christmas decorations up. As I was in the back of her closet getting Christmas decorations out I came across these: (which is why I'm telling you about what happened last Thanksgiving ;) 

Tuesday, November 26, 2013

Thirty Grateful Days Mini Album

The girls over at Paper Issues have joined together to take photo each day for the month of November documenting things we're thankful for. Today I'd like to share with you a little bit of my album. I created it using the Thankful line from Bella Blvd. Here's what I came up with:

This album is going to be much bigger than I initially thought it would be. So when it's finished it will probably be in large binder rings instead of the clipboard album.
I created the album with heavy brown cardstock cut into 5x7 pieces. I completed the entire album before I added any photos. I left room for one photo each day and planned on having 2 pages for Thanksgiving day since I know I'll take more photos that day.
Here's an example of what the pages look like before I added photos.

I added a few embellishments when I added my journaling and photo(s)
 On this page the journaling is under the photo. I used designer tape as a hinge so you can flip the photo up and read the journaling. It's a bunch of "kissy stuff" as my kids would say because it's about the note my husband wrote to me.
 Most of the photos I printed at 3x3. If I had more than one photo sometimes I printed them at 2x2.
On days that I had too many photos to fit on one page I made pockets for multiple photos either out of patterned paper or transparencies.
Here's what the transparency pocket looks like. There are several photos tucked in there because it was my birthday on the 10th. I took lots of photos with the kids and the presents they had given me.

And here are a few more pages...


Even if you didn't take a photo a day grab a few photos that you've already taken and put together an album of the things that you're grateful for.
Thank you for stopping by! I appreciate you visiting my blog today.
BLOGGER TEMPLATE BY DESIGNER BLOGS